Looking to spend some fun time crafting with your kids? Want a project that doesn't require a ton of special supplies? Then you're going to love these Halloween Rock Art Ideas!

Halloween will be here before we know it and these Halloween Rock Art Ideas are super fun!
You can go out and hunt down your own rocks or you can purchase them. When we're out hiking, we often look for rocks for these kinds of projects. At one point, my son had 2 Home Depot 5 gallon buckets filled with rocks he had collected.
Now that we have over an acre of land, we've been able to find rocks on our own property! 🙌🏼 {Although at the rate we're going, we'll go through all the rocks around here in no time!}
If you decide to hunt for your own rocks, make sure your rocks don't come from a protected natural area. We often find great ones near rivers and streams.
If you're not up for hunting down rocks or if you can't find any good ones near you, you can snag rocks on Amazon. You can also visit a local garden center or a local landscaping company. Many of them will sell rocks by the bucket-full.
While you may be tempted to grab those super smooth rocks you see at craft stores, I recommend you avoid them. They are designed with a protective coating on them. The protective coating can make it difficult for paint to stick to them.
Halloween Rock Art Instructions:

Start by painting each of your rocks a solid color. For these rocks, we did 2 solid black, 1 green, 1 purple, and 1 orange.
Once your paint has dried, lightly sketch your design onto the rock.
For these projects, you may want to use paint pens for your designs…especially for the more detailed designs like the spider web, the grass behind the pumpkin, and most of the details on the witch on the broomstick.
We'll start with the 2 rocks you've painted black.
Candy Corn Rock Art

To create the candy corn designs on this rock, I recommend using a pencil to sketch slightly rounded triangles onto the rock.
Next, draw an oval into the bottom of the rounded triangle. Paint the inside of the oval yellow.
Once your yellow paint has dried, paint the middle part of the triangle orange.
When the orange paint has dried, paint the tip of your triangle white.
Congrats! You have a candy corn rock!
Also, if you love candy corn, make sure to check out this recipe for Homemade Candy Corn!
Scary Ghost Rock Art

This Halloween ghost rock is so fun…and it's easy-peasy to make. Once your black paint is dry, use a pencil to sketch a ghost onto the rock. It doesn't have to be anything fancy.
Use white paint to fill in your ghost sketch. Once your white paint is dry, paint three black ovals onto your ghost for eyes and a screaming mouth.
See! Told you it was easy-peasy to make ghost rock art!
Spider Web and Spider Rock Art

We used an orange rock for the spider and spider web, but you can use any color rock that makes you happy.
While this design looks a little tricky, it's pretty simple. You'll want to use a pencil and a ruler to draw 4 intersecting lines. (You're basically dividing the rock in half, dividing it in half the other way, then splitting each of those sections in half. {It's like a geometry project}
You can do this next part with a paint pen or a sharpie. It's up to you. I've done it both ways and been happy with both, but if you use a Sharpie, make sure it's a new one and that your paint is fully dry before you start using your sharpie.
Trace your pencil lines with your sharpie or paint pen. Then place a dot in the center where your lines all intersect. From there draw 6 or 7 dots on each line between the center point and the edge of the rock. You'll then connect these lines with your Sharpie or Paint Pen to make your web.
To make your spider, paint 2 circles for the head and the body, then add 8 legs.
And now you have a spider rock!
Pumpkins at Night Rock Art
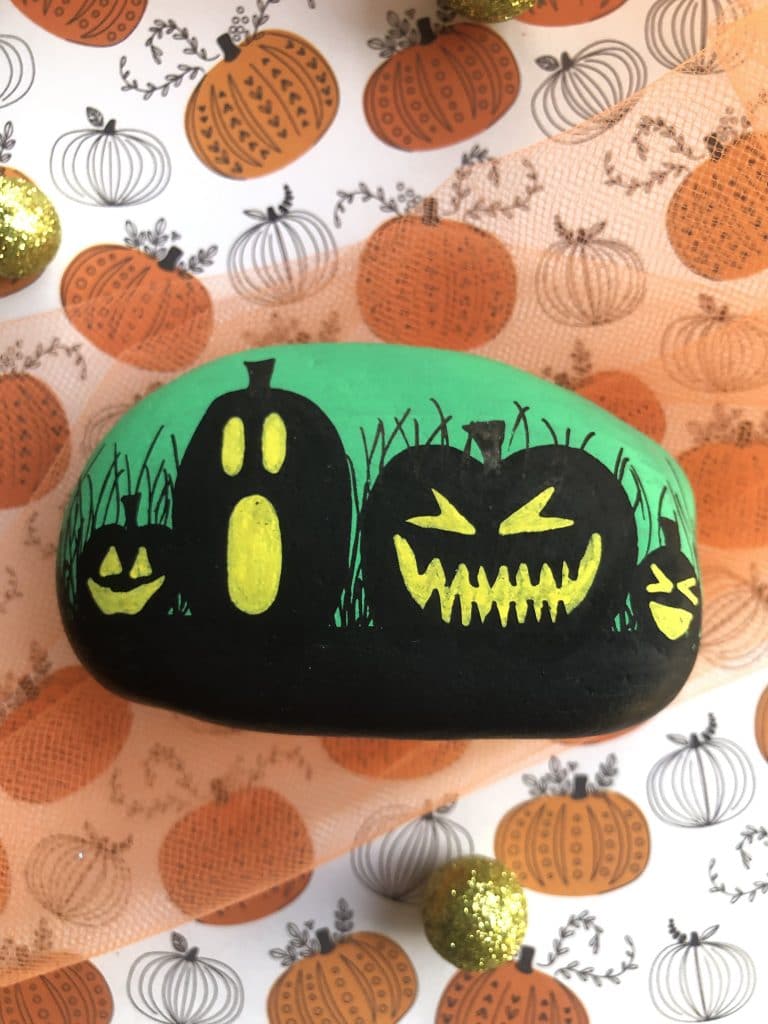
This design is a little trickier, but I know you're up for it! And once you break it down, it's easier than you think!
You're going to use your green rock for this. While you could use another color, I think the green gives it an eerie night sky feel!
This is another design where I'd probably opt to do the black parts in Sharpie. It's easier and gives you a little more control. If you're a whiz with a paintbrush or if you have good paint pens, that's another great option.
I'd start by painting or coloring the bottom 5th of the rock black. Then add your pumpkin outlines. (I did mine in pencil first).
Next color in your pumpkins black and add some black grass behind them.
When your black paint or Sharpie is dry, draw your faces on your pumpkins with a pencil. When you're happy with your designs, you can fill them in with yellow paint.
That was easy!
Flying Witch Rock Art

I saved the trickiest design for last. But I believe in you!
For this design, I'd start by painting the bottom of your rock black. Next, use a pencil to draw your house (a simple square and triangle will do) and your moon (a simple circle will do for this).
Paint your house black and use lavender or white for your moon. If you painted your rock a color other than purple, you can use a lighter version of that color for the moon or you can use white.
When those are all dry, you'll want to use a pencil to draw your windows for the house, your tree, and your witch on her broom.
Next, paint your windows yellow.
When you're happy with your tree and witch pencil drawings, trace them with a black paint pen, then use that paint pen to draw your grass and your birds.
And you did it!!!!
Rock Art Supplies
- Rocks
- Pencil with eraser
- Pens
- Paint
- Paintbrushes
- Paint Pens
- Gel Pens
- Sealant
- Glue
- Glitter
- Any fun decorations that you’ll want to glue onto the rocks {I'm a big fan of pompoms and googly eyes and this kit has both}
Rock Painting Tips & Tricks
For starters, you'll want to make sure your rocks are clean and free from dirt and grime. I like to use water and a dish brush to clean our rocks. I typically keep some Dollar Tree dish brushes on hand for projects like this.
Once your rocks are clean and dry, you can begin creating your designs. I find it's helpful to lightly trace your design with a pencil first.
If you want to paint your rocks, acrylic paint works best.
If you plan on using paint pens or regular pens to create your masterpieces, here are my recommendations.
If you’d like to glue anything to your rocks, I swear by E6000 {FYI: it is important to seal your rock with sealant prior to gluing items!}
I also recommend sealing your rocks after you’ve finished decorating them. You can use whatever finish you’d like (glossy, matte, etc). These can be found online or in your local craft stores.
Rock art is supposed to be relaxing and fun. Enjoy yourself! Be creative! And don't stress!!!
Pin These Halloween Rock Art Ideas for Later!

