This is a sponsored conversation written by me on behalf of Cricut. The opinions and text are all mine.
When I found out I was going to have the opportunity to partner with Cricut, I made a list of projects I wanted to create. Home organizing products, holiday-themed products like these DIY Valentine's Day gifts, and of course, t-shirts. But the thing I was most excited to make was a Cricut Infusible Ink t-shirt.

I had seen a variety of Cricut Infusible Ink projects across the web and on Pinterest and was so excited to try my hand at it, but if I'm honest, I'll admit I was also terrified. What if I ruined this project? I had no idea how to use Cricut Infusible Ink or how to use an Easy Press 2.
Thankfully, the Easy Press 2 lived up to its name and was super easy to use and the Cricut Infusible Ink was surprisingly easy as well. And the best part was that my teen daughter was soooo thrilled with the t-shirt I'd made her (and if you have teenagers, you know that having your fashionista daughter love something you made her is one of the best feelings in the world).
Infusible Ink T-Shirt Supplies
If you want to make a t-shirt using Cricut's Infusible Ink, here's what you'll need.
- Cricut Maker or Cricut Explore Air 2 (I have this one)
- EasyPress 2 (I have this one)
- Infusible Ink Transfer Sheets (I used these)
- Cricut T-Shirt (I used this one)
- White Cardstock
- Standard Grip Mat
- EasyPress Mat
- Weeding Tools (This one is my personal fave)
- Portable Trimmer (optional)
How To Make A T-Shirt With Infusible Ink
If you're making this shirt for the teenager, have them try on the shirt before you start the project. My daughter is extremely picky about how shirts fit and so I decided I'd have her try it on before I put any effort into the project.

Once you know what you're working with, measure the front of the t-shirt to decide the size of the design or wording you want to add to the t-shirt. We decided to make our file just shy of 8″ x 5″.
Next, we looked through Design Space to find a graphic we loved. We were originally thinking about making a manatee t-shirt until we came across this graphic and immediately fell in love. Shayna is an introvert and this design totally resonated with her and made her laugh.
After we chose our design, we adjusted the size to fit the space we'd measured for.

The way this design is laid out, it's meant to be cut on 2 different colors of vinyl, but since we're using infusible ink, we'll want to weld the design together to cut it all out at one time.

Once your design is welded together, you're ready to move on. You'll want to click on the Make it button in the top right corner.

Now don't cut yet…you still have one BIG STEP you need to do before you cut. Because we're using infusible ink, we need to mirror the design. If you don't do this, your design will end up being backward on your shirt.

After you click on the mirror button, your design will flip.
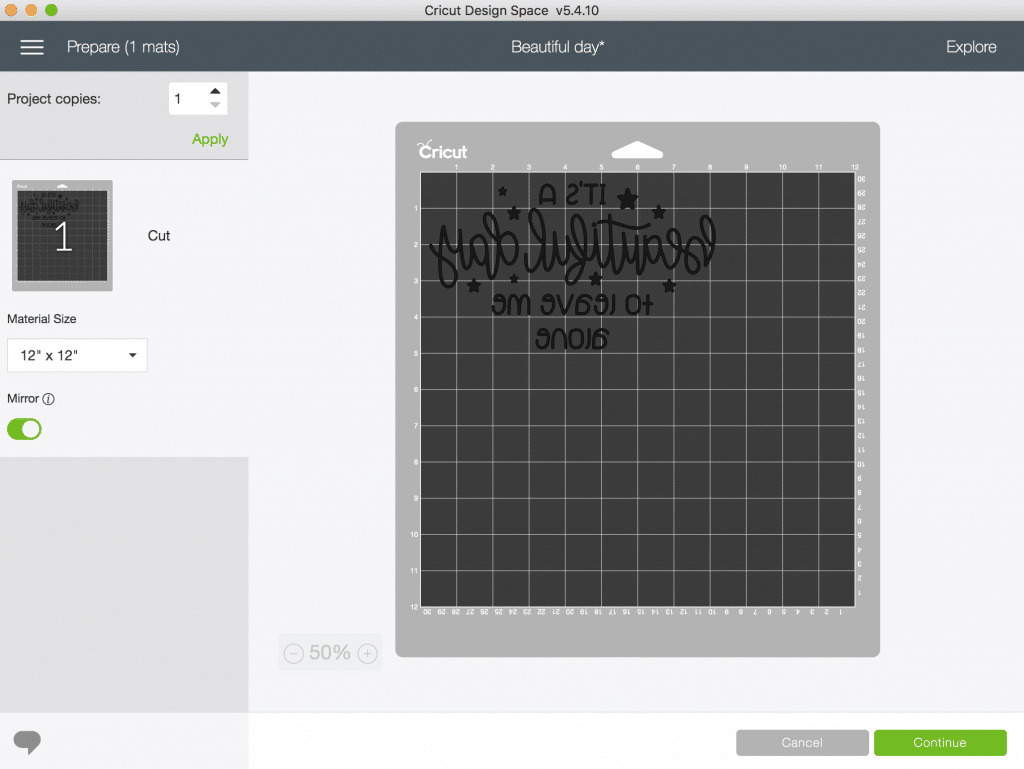
Ok…we're ready to move forward and start with the cutting.
What you'll want to do next is click the continue button, plug into your Cricut machine, choose the Custom setting and then choose Infusible Ink Transfer Sheets.

Now you'll want to put your infusible ink on your mat and load it into your machine.

Now you're ready to hit the “C” button to cut your design.

Once your design is cut, it should look like this…backwards. 🙂 Now you're going to want to remove the mat and then you'll want to start weeding.


I like to start by weeding all the big spaces outside the design.

Next, remove all the smaller pieces inside of the letters.

Your design is now ready to go. It's time to preheat your EasyPress 2 to 385 and get your t-shirt prepped.

In order to prep your t-shirt for the infusible ink, you'll want to put a sheet of cardstock in between the layers of the shirt. If you have pets or if your shirt has been laying on or around something fuzzy, you'll want to use a lint roller or piece of tape to make sure the front of the shirt is free from any extra lint or fuzz.

Next you'll lay your t-shirt on your EasyPress pad and your Cricut Infusible Ink Transfer Design on the top of your shirt.

Now you'll want to cover your design with a piece of butcher paper (don't worry, this comes in the package with your Cricut Infusible Ink Transfer sheets).

Now you're ready for the magic to happen!
Apply your preheated EasyPress 2 to the top of your design and hold for 15 seconds.

On a positive note, my project still turned out AMAZING!

Once you've put your EasyPress 2 back on the stand, you can remove the butcher paper and slowly peel off the transfer sheet. You'll be amazed at what you've been able to accomplish.

Voila! You have a gorgeous t-shirt! Don't forget, you can use my file to make your own fun “It's a beautiful day to leave me alone” t-shirt.
Make sure to pin this project for later!

